Summer has come and gone and the weather is getting colder. As the mercury drops, the bills get higher. Here we will look at 5 easy ways to start saving energy (and money) with your Fibaro system.
Take a light and set its value to 100%. Notice how bright it is. Now, begin reducing the brightness of the light 1% at a time until you notice that the lamp gets dimmer. With a halogen lamp you probably won't notice a difference until about 80%. This gap, which is different on each type of light source, is due to the way our eyes perceive light. Although we don't notice the difference in brightness, your electricity meter will notice the difference in power usage. So by reducing the maximum dimming level of the Fibaro dimmer to 80%, you could save up to 20% in your lighting bill.
1 x Fibaro Dimmer Module for each lighting circuit you want to save energy on.
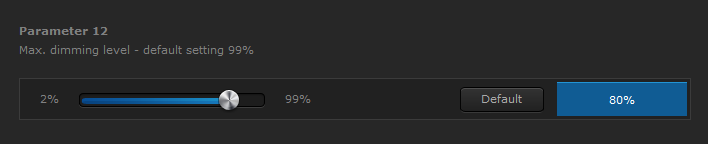
Change the value of parameter 12 (Max. dimming level) to 80%:
The dimmer will limit the maximum brightness to the value you set in parameter 12, however, the slider shown in the app and web interfaces will show this new value as 100%. So, with the settings above, setting the slider on the interface to 50% will cause the dimmer to dim to 40% (50% of 80%).
Different types of lamp will have different points at which your eye will be able to distinguish the change in brightness. So you will need to experiment with the levels – you may find you could save up to 40% of your energy if the lamp only started dimming below 60%.
Turning off lights when we leave home and turning off or reducing heating is an obvious way of saving energy, however remembering to turn everything off (or having time when you are in a rush) is sometimes not possible.
Wouldn't it be better to have an "I'm going out" button by the door which you could press on the way out? With one press, your internal lights wold turn off, your external lights would turn on and your heating would turn down.
Using Lua, we can monitor Fibaro dimmer module's scene activation event – this allows us to identify the number of times a switch has been clicked. In this way, we can use the switch by the front door to control its usual lights, but have a double click perform the "I'm going out" actions.
1 x Fibaro Dimmer Module
Various other modules controlling the other devices in the home you want to control upon leaving.
The scene activation event is disabled by default when the Fibaro Dimmer module leaves the factory. To trigger different scenes when the button is pressed once, twice or three times, you need to activate parameter 41 of the dimmer.

Now that scene activation is enabled, we can write a scene that can be triggered by it. In the following example, the dimmer's device ID is 30, change it as necessary:
                	--[[

 %% properties

30 sceneActivation

%% globals

--]]


local lightID = 30


local scene = fibaro:getValue(lightID, 'sceneActivation')


-- 16 == single click: ignore it - let light turn on and off as normal.

if (scene == '14') then -- double click

  -- actions for double clicks go here

elseif (scene == '15') then -- tripple click

  -- actions for tripple clicks go here

end
You can use fibaro:call() to perform the actions turnOn, turnOff and setValue on different devices, or fibaro:startScene() to run a different scene (perhaps a graphics block scene) to keep this code neat and tidy.
When you are in a room, you want it to be well lit and nicely warmed. However many times, we leave a room – expecting to return in 5 minutes, only to be distracted for one reason or another and forget that we haven't turned off the lights or the heating.
Using a Fibaro Motion sensor and Lua on the Home Center 2, we can detect the absence of movement in a room and use this to turn off the lights a short while later. If movement is still absent for an extended period of time, the heating can also be turned off.
1 x Fibaro Motion Sensor – one for each room you want to monitor
1 x Fibaro Dimmer Module – one for each lighting circuit in each room.
1 x Fibaro Dual, Single Relay Module - one for each of the heat sources in each room.
Create the following Lua scene (in this example, our motion sensor is device 65, you will need to change it):
--[[

%% properties

65 value

%% globals

--]]


local motionID = 65

local lightDelay = 30     -- 30 seconds

local heatDelay = 15 * 60 -- 15 minutes


-- Only allow one instance of the current scene to run at a time

if (fibaro:countScenes() > 1) then

  fibaro:abort()

end


local motion, mTime = fibaro:get(motionID, 'value')


motion = tonumber(motion)

mTime = os.time() - mTime -- convert this to number of seconds ago.


 function turnThingsOn()

   fibaro:call(71, 'turnOn') -- light

   fibaro:call(76, 'turnOn') -- light

   fibaro:call(84, 'turnOn') -- heat

 end


if (motion > 0) then

   -- there is motion - make sure the lights and heating are on

   turnThingsOn()

else

  -- there is no motion - wait until there has been no motion for the required time

  -- then turn off the lights and then the heating.

  local lightsOn = true

  local heatingOn = true

  while ((motion == 0) and (lightsOn or heatingOn)) do

    if ((mTime >= lightDelay) and lightsOn) then

      lightsOn = false -- only let this happen once

      fibaro:call(71, 'turnOff') -- light

      fibaro:call(76, 'turnOff') -- light

    end


    if ((mTime >= heatDelay) and heatingOn) then

      heatingOn = false -- only let this happen once

      fibaro:call(84, 'turnOff') -- heat

   end


    fibaro:sleep(1000) -- give the system some breathing space


   -- then check it all again...

    local motion, mTime = fibaro:get(motionID, 'value')


    motion = tonumber(motion)

    mTime = os.time() - mTime -- convert this to number of seconds ago.

  end -- jump back to the top of the loop


  -- only gets here if the loop finishes

  -- and that only happens if everything is off

  -- or there is motion again.

  if (motion > 0) then

    turnThingsOn()

  end

end
In the above scene we have turned off relays to control the heating. If you have Z-Wave radiator valves (for example, the excellent Danfos TRVs), then rather than turning them off and on, you need to adjust their setpoints to very low (the equivalent to off) or normal (the equivalent to on). Use the fibaro:call() function to do this, but use the setValue action instead of turnOn and turnOff.
In some areas, you won't have a motion sensor to enable you to detect presence. You can still guard against accidentally forgetting to turn off devices by writing a Lua scene on the Home Center 2, which will automatically turn them off after being on for a certain amount of time.
Fibaro Dimmers, Fibaro Relays or Fibaro Wall Plugs for each device you want to turn off automatically.
Create the following Lua scene:
--[[

%% properties

56 value

78 value

29 value

40 value

%% globals

--]]


local devices = {56, 78, 29, 40}

local times   = {60, 30, 900, 600} -- each time (in seconds) here relates to each device above.


-- Only allow one instance of the current scene to run at a time

 if (fibaro:countScenes() > 1) then

  fibaro:abort()

end


-- return true if all devices in the list are off

function allAreOff(deviceList)

  local res = true

  for key, devID in pairs(deviceList) do

    local val = fibaro:getValue(devID, 'value')

    res = res and (val == '0') -- true if this and all previous devices are off

  end

  return res

end


while (not allAreOff(devices)) do

  -- check each device to see if it needs to be turned off.

  for key, devID in pairs(devices) do

    local val, timesince = fibaro:get(devID, 'value')

    val = tonumber(val)

   timesince = os.time() - timesince

    if ((val > 0) and (timesince > times[key])) then -- it's on and it has been on for too long

     fibaro:call(devID, 'turnOff') -- turn it off

    end

  end

  fibaro:sleep(1000) -- 1 second of peace

end
This scene will turn off devices such as the Fibaro Dimmer, Fibaro Relay and Fibaro Wall Plug and any other device that accepts the turnOff action and sets its value property to 0 when it is off.
Using a Fibaro Wall Plug, the exact amount of power being used by a device can be monitored. Using a virtual device and Lua on a Home Center 2, we are able to communicate with the energy panel and calculate the exact monetary cost this device has incurred today. Using this, we can automatically turn off the device if we have spent too much on it today.
1 x Fibaro Wall Plug
1 x Fibaro Home Center 2
You will need to download the Power Consumption Virtual Device.
Download the virtual device and import it:
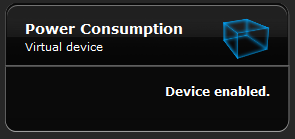
This virtual device will turn off a wall plug automatically. It will not turn it on again automatically.
The virtual device measures energy used from midnight each day, not within a 24 hour period. If the wall plug turns off due to over use, it will reset at midnight.
For information on turning off your heating when your windows open, see Five things to do with your new Home Center.
For some more ideas of the things you can do with Fibaro, have a look at our tutorials section.
For more information on Lua, see our Lua support page.