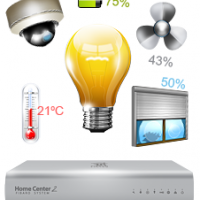
So, you've just set up your Fibaro system and your devices are all added and have sensible names and locations. You can control your home from your phone! Anywhere! It is all very exciting, but … what next?
In this tutorial we will look at 5 simple things you may want to do with your new system. In most cases we will use graphics blocks to create our scenes – which means you can use the Home Center 2 or the Home Center Lite. However, in some cases there are times when you will need the advanced capabilities of Lua, which are only available on the Home Center 2.
Using graphics blocks, the Home Center 2 and Home Center Lite can be told to automatically perform actions when other events happen. Lights can be instructed to turn on with movement or at a particular time, heating can be set to a temperature based on the state of your windows or doors. The possibilities are really down to how creative you can be with the system – and with automation, as many other creative arts, there are several ways to achieve the same outcome.
After trying the examples in this article, experiment with your system and you will come up with your own unique scenes.
Below you will find one possible way to achieve the following automatic actions:
You come home from shopping. Your arms are full of bags. You just manage to turn the key in the lock and you fumble in the darkness trying to find the light switch. In frustration, you put the shopping down on what you assume is your empty floor, only to squash the cat, who, unlike you can see in the (almost) dark.
Wouldn't it be nice if your lights could turn on when you opened the door?
1 x Fibaro Door/Window Sensor
1 x Fibaro Dimmer Module
Create the following graphic blocks scene:
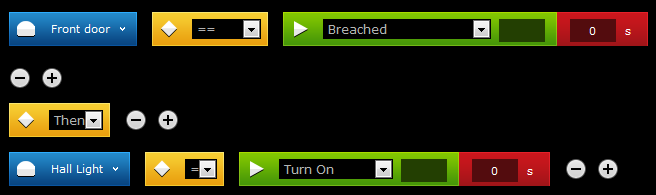
This scene will turn the light on when the door opens, but it will not turn it off – use your light switch or mobile device for this. It will also turn the light on regardless of the need for light – even when it is daytime. Further logic could be added in the top section to only turn the light on if the door is open AND there is light – you would need a lux level detector for this (like the Fibaro Motion Sensor for example).
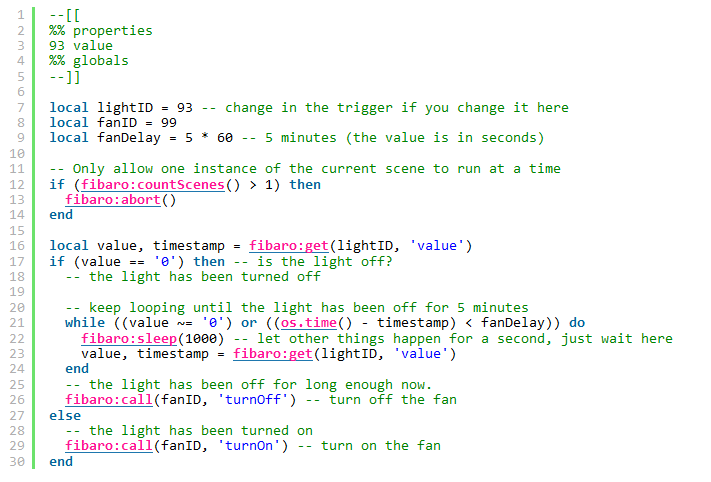
Here will link the bathroom fan with the Dimmer which is controlling the light. When the light turns on, the fan turns on and vice versa. Using Lua we can have more advanced control and time the fan to turn off after five minutes – more on that later.
1 x Fibaro Dimmer Module
1 x Fibaro Dual or Single Relay Module
Create the following graphic blocks scene to turn the fan on:
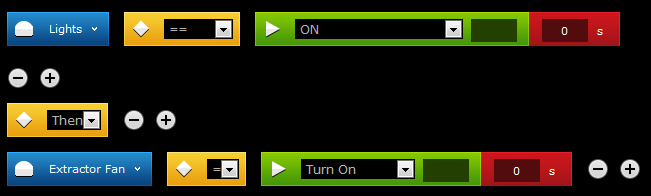
Create the following graphic blocks scene to turn the fan off:

As you can see, with graphics blocks you need to have two scenes to control each fan. Using Lua on the Home Center 2, you can combine these into one scene and delay the fan turning off by a set amount of time.
Used in areas at risk of leaks and floods, the Fibaro Flood sensor can detect water and alert you to the problem before it becomes serious. If this is in an area that is difficult to access or rarely visited, receiving a push notification on your smart device in the event of a flood could prevent major damage to your property.
1 x Fibaro Motion Sensor
A smart device that receives push notifications.
Create a notification to be pushed to the mobile device:
Create the following graphic blocks scene:

This scene will push to one mobile device. You can add more notifications by:
You can repeat these steps for as many notifications as you like.
When your TV, fridge, washing machine or other device turns on or changes operation, the amount of power being consumed by it will change too. The Fibaro Wall Plug can detect these changes and use them to trigger actions.
1 x Fibaro Wall Plug
Create a notification to be emailed when the scene runs:
Create the following graphic blocks scene:

This scene will email to one user. You can add more by:
You can repeat these steps for as many notifications as you like.
More complex scenes (for example, reacting one way when the device turns on and another way when it turns off) can be written using Lua, which is only available on the Home Center 2.
When the weather gets cold and your heating is trying its best to keep your home warm, leaving a window open could cause your bills to go up as all your energy is spent heating the air outside your house.
Fitting a Fibaro Door/Window Sensor to the windows in your home and turning your thermostat's set points down automatically if the windows are opened may be the answer to your problem.
1 x Fibaro door/window sensor for each window in the room, and
1 x Z-Wave radiator valve for each wet radiator in the room, or
1 x Fibaro single relay configured as a linked device for each electric heating device
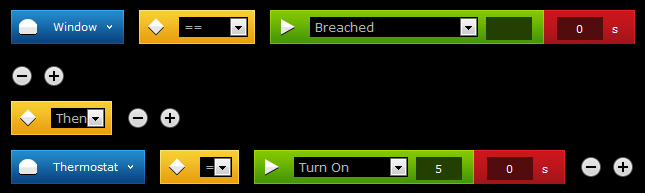
Create the following graphic blocks scene:
You can add more windows in this room by:
You can add more actions than just turning down your heating by:
This scene will turn your heating down to 5 degrees to prevent frost. When the window closes again the heating needs to turn back up. You could write a scene in graphics blocks to do this but the level it sets the heating to would be a fixed level.
A better way to achieve this task would be to use Lua on a Home Center 2 and have the following scene:
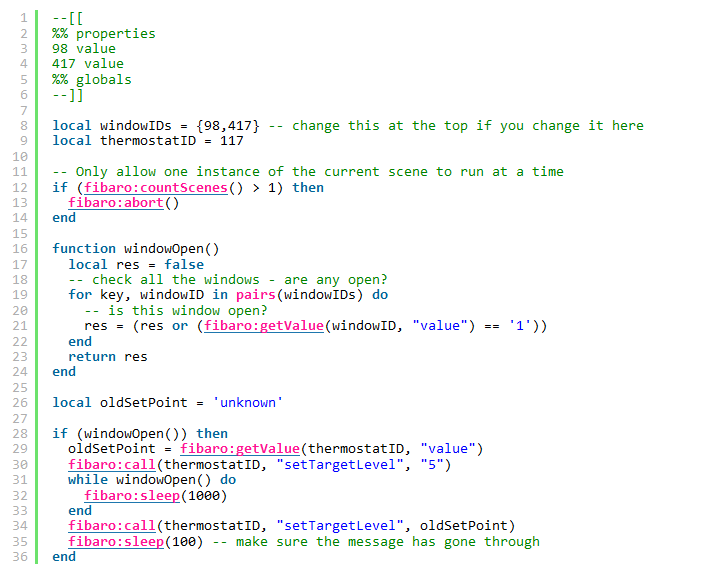
In this scene there are two windows (98 and 417); change these to match your system. Place any windows into the table on line 8 and make sure you add them in the triggers section (lines 3 and 4 here) as well.
For some more ideas of the things you can do with Fibaro, have a look at our tutorials section.
For more information on Lua, see our Lua support page.