Constant light levels with the Fibaro motion sensor and dimmer modules


The Fibaro motion sensor is three sensors in one (four if your count the accelerometer). It monitors movement in a room, the temperature of a room and also the lux (or light level) in a room. We can use the lux monitoring combined with a Fibaro dimmer module to enable the light level in a room to be maintained.
RGBW Controller

WHAT WILL I NEED?


To repeat the steps in this tutorial you will need to install a Motion Sensor and Dimmer Module on a Fibaro Home Center 2. These devices should be placed in the same room of your house.

WHAT WILL WE DO?


We will create two Lua scenes. Our scenes will use a global variable to pass information between them.
One scene will monitor the light switch and toggle the value of the global variable each time it is switched.
The other scene will run continuously and monitor the value of the light sensor and the dimmer module. If the global variable is turned on, then it will increase or decrease the value of the dimmer to try and maintain a constant level of light in the room.

LET'S GO!


When you install the Fibaro Motion Sensor, three devices are created on your Home Center 2:

  1. A Motion Sensor
  2. A Temperature Sensor
  3. A Light Sensor

We are interested in the 3rd device.
By default, the level of light in a room will need to change by 200lux in order for the sensor to report it to the Home Center 2. We want to decrease this value so that the changes in light will be detected more precisely. However, keep in mind that the lower this value, the more often the device will want to send changes – the more often it wants to send changes, the more often it has to turn on its radio – the more often the radio is turned on, the quicker it will run out of batteries. For this tutorial, we will change it to a value of 20lux, but this value may not suit your purposes – adjust it accordingly.

Changing the reporting level


To modify the lux level change threshold, follow these steps:

  1. Click Devices in the main menu.
  2. Scroll down to locate the Motion sensor device you wish to modify.

    Note: As we are about to change a Z-Wave parameter, make sure you locate the master motion device, not the slave light level device!

  3. Click the spanner icon located in the top right corner of the device, to enter the device's configuration page.
  4. Click the Advanced tab.
  5. Scroll down three quarters of the page until you can see Parameter 40.
  6. Click on the white number (200 by default) at the right of the parameter's slider and change it to 20.
  7. Click on the Save button
  8. The motion sensor is a sleeping node, so it needs to be woken up to receive configuration changes. Wake up your motion sensor by tripple-clicking the button located inside it's shell.

Now your motion sensor will report changes in the light level of the room as small as 20lux.

Enable sceneActivation


We also need to modify the parameters of our dimmer module to enable sceneActivation.
By default sceneActivation is turned off, but this feature allows us to detect when the switch on the device is clicked. We will use this to monitor when the light is manually turned off (so that it doesn't automatically light the room at night!).

  1. Click on the Scenes button in the main menu
  2. Click Add Scene on the left menu.
  3. Give your new scene a name (switch monitor, for example) and assign it to a room.
  4. Click on the Advanced tab.
  5. Click the Save button located under Add scene in Lua.
  6. Copy the following code into your scene replacing the comment block that is automatically created:
    RGBW Controller
  7. Modify the local variable (on line 35) to be the device ID of your dimmer.
  8. Modify the trigger ID (on line 3) to be the device ID of your dimmer.
  9. Click the save button on the right of the page

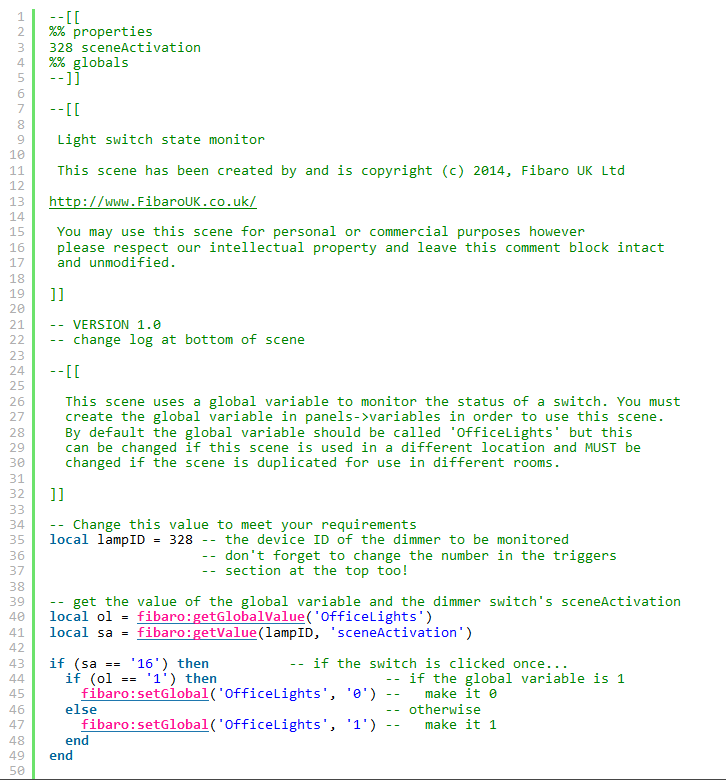
This scene will begin to work immediately. Its only job is to change the value of the global variable when the switch is clicked. If it is 1, make it 0. If it is 0, make it 1.

Create your scenes – part 2


We will now create a scene in Lua to monitor the level of light and increase or decrease the value of the dimmer as required.

  1. Click on the Scenes button in the main menu
  2. Click Add Scene on the left menu.
  3. Give your new scene a name and assign it to a room.
  4. Click on the Advanced tab.
  5. Click the Save button located under Add scene in Lua.
  6. Copy the following code into your scene replacing the comment block that is automatically created:
    RGBW Controller
  7. Modify the local variables (starting on line 35) so they suit your system. Pay particular attention to luxID and lampID. These should be changed to the device IDs of your light sensor and dimmer devices respectively.
  8. Click the save button on the right of the page

SO HOW DOES IT WORK?


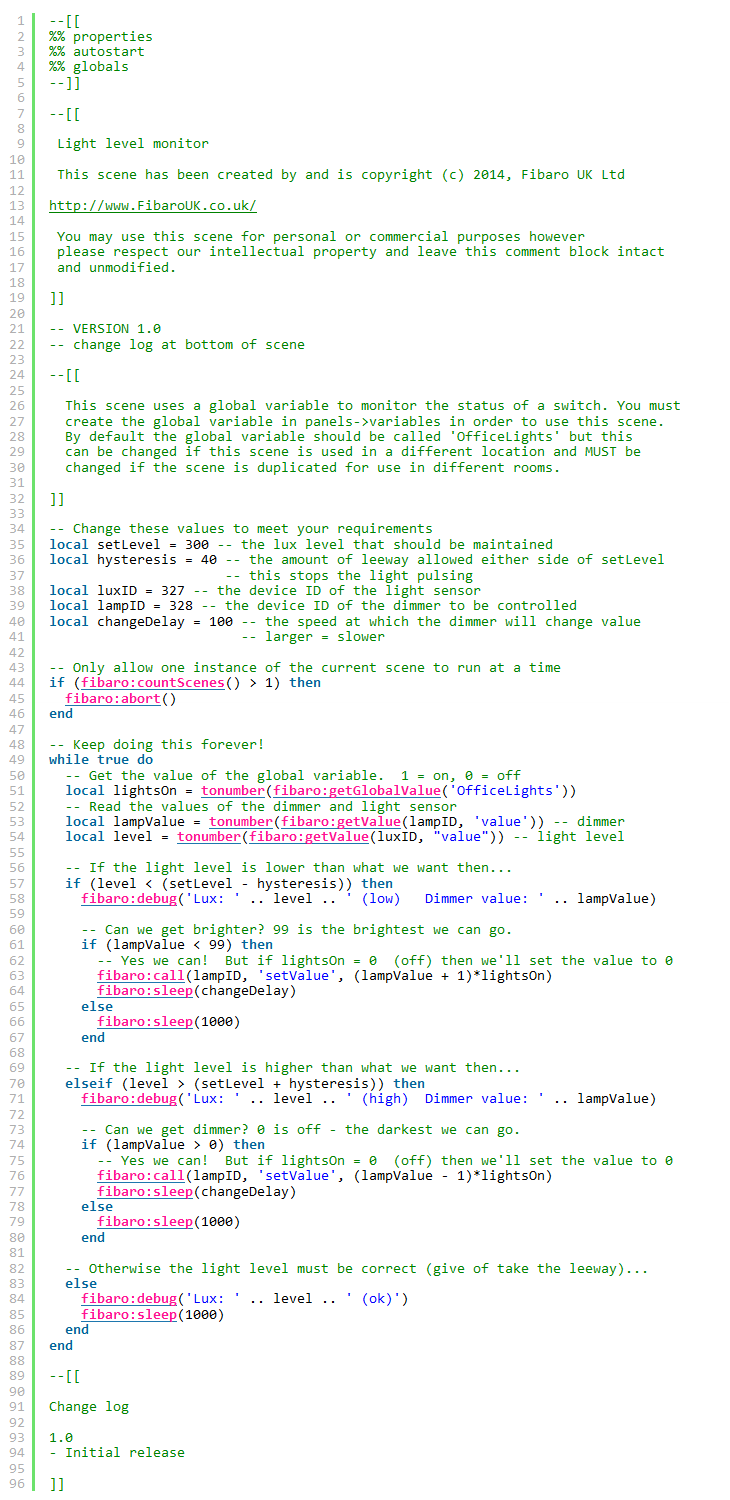
At the top of the scene you will see the li

%% autostart

This causes the scene to start running as soon as the Home Center 2 starts (or the scene is saved).
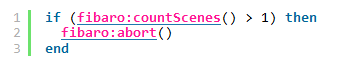
The following lines allow this scene to run only once at a time (just in case it is manually started):

Once the scene is running, it then starts (on line 50) an infinite loop which causes the remainder of the scene to repeat forever.

The steps in this forever repeating loop are as follows:
Lines 52-55:
Get the values of the global variable, the dimmer and the light sensor
Lines 58, 71 and 84 :
See if the light level is too low, to high or just right. Each of these tests has an associated block of code.

  • If it is too low it increases the value of the lamp by 1 (as long as the light is not already fully on)
  • If it is too high it decreases the value of the lamp by 1 (as long as the light is not already off)
  • If it is ok, it sleeps for a second.

Lines 64 and 77 are the lines that are used to set the value of the dimmer. The new value is multiplied with the value of the global variable. This is going to be either 1 or 0. In this way, if the lights should be off, the value of the dimmer will be set to 0.

Some thoughts


There are several factors which influence the settings of this scene:

  • The difference in light level which the light sensor will report (parameter 40 of the motion sensor). The smaller the value, the more precisely the sensor will report, but the quicker the battery will drain.
  • The value of setLevel (line 35 of the main scene). This will be different in every location. Watch the scene's debug output to help you adjust this.
  • The value of hysteresis (line 36 of the main scene). This will determine the range of values around setLevel which the scene will consider 'close enough'. The bigger this value the less prone the light will be to pulsating when the room is at the correct light level. However, if it is too big the light level in the room will jump from one level to another.

WHERE NOW?


For more information on programming the Home Center 2 in Lua, see our support page at lua